Butt Wink Video
This video is a sort of “summary” of my thoughts on butt wink. It contains about 80% of the information on this page.

Introduction
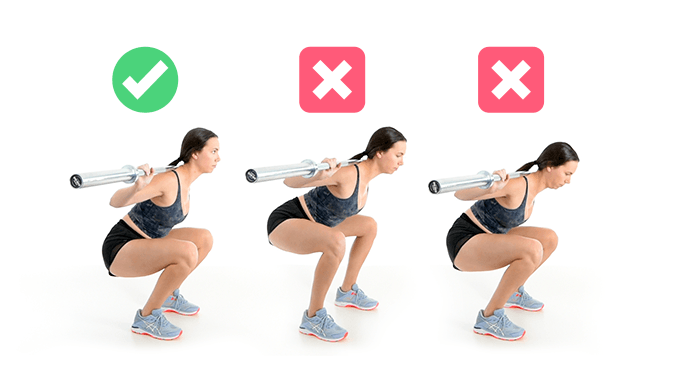
In this post, we’ll talk about butt wink when squatting: what it is, why it’s a problem, and how to fix it.
What is Butt Wink?
Butt wink is a rounding of the low back with posterior pelvic tilt that arises due to mobility limitations. It is generally easy to correct with proper squat and deadlift technique, but anatomical differences do play a role.
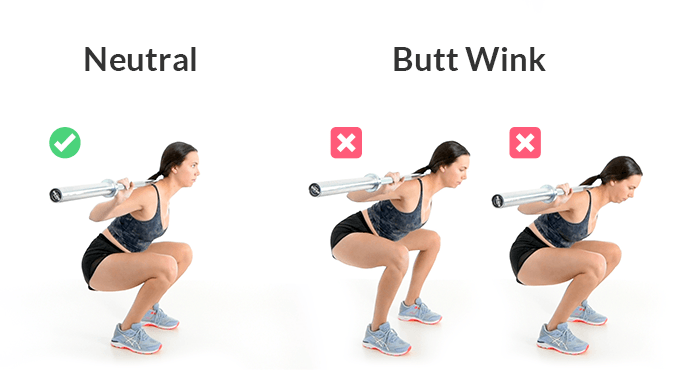
The 2 Different Types of Butt Wink
There are a few different ways that I’ve seen butt wink demonstrated and described on the internet. To me, there can be only one, but it’s important to define the two because though we might call them the same thing, they are totally different.
Reversed Spine Butt Wink
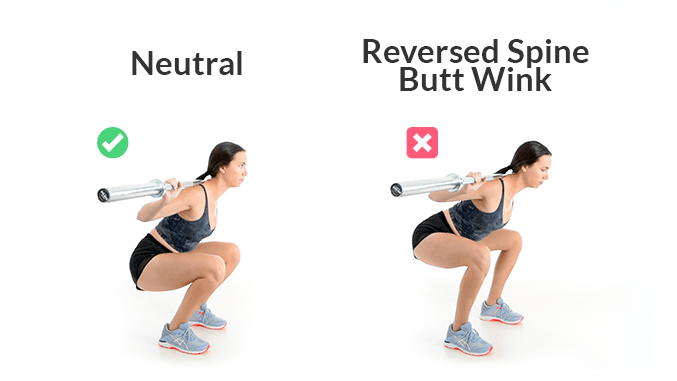
A reversed spinal curve is both the most common and most concerning type of butt wink. To understand this problem, we first need to know what a normal spine looks like and how it can deviate from this normal.
Anatomy of a Normal Spinal Curve

The spine has a wavy shape that dictates functional differences between the various segments of the spine. There are five segments in total: coccyx, sacrum, lumbar, thoracic, and cervical. The coccyx and sacrum pieces fuse as we develop into a human, so we usually only discuss the top three segments: lumbar, thoracic, and cervical.
Each segment adopts one of two types of curvature: lordosis or kyphosis.
Kyphosis is known as a primary curve because we see it first, i.e., in fetal development. Lordosis is a secondary curve that forms after birth.
Normal spine curvature in standing is 45 degrees of lumbar lordosis (cite), 40 degrees of thoracic kyphosis (see previous citation), and 34 degrees of cervical lordosis (cite). This research article from 2018 examines individual differences in lumbar lordosis if you care to dive deeper.
In general, when we talk about a “neutral” spinal position, we’re aiming for this normal curvature.
Anatomy of a Straight Spine

When these normal, complementary curves of the spine are eliminated, the spine is straight and flat.
This reduces mobility through the spine AND every other joint in the body.
This posture is beneficial for supporting heavy weights, like during squats and deadlifts, but detrimental for rest and recovery.
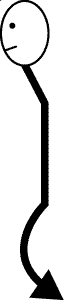
Anatomy of a Reversed Spinal Curve

When the spine’s normal curvature is flipped, we say the spine is reversed. This happens when the back is flattened for stability, but then mobility is challenged past what is possible. This position is always undesired as it limits both mobility AND stability.
In fact, the reversed spinal curve is the essence of butt wink: thoracic extension and lumbar flexion.
This curve is generally a product of poor technique. You see it most often in lifters misusing cues such as “keep your chest up” and “keep your back arched”. Excessive arch in the spine steals hip flexion mobility, so the lumbar spine ends up rounding in the bottom half of the movement. This allows the lifter to squat lower, but compromises their stability and spine health.
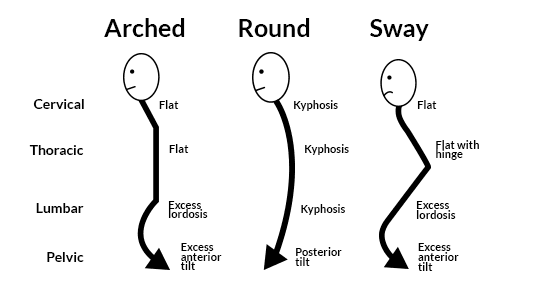
Rounded Back Butt Wink
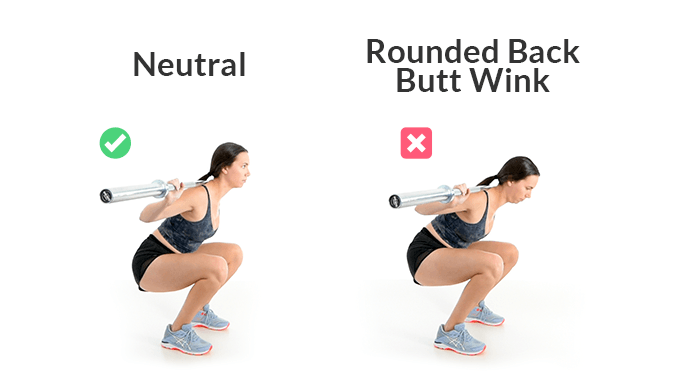
A rounded back butt wink is NOT really what I picture when I hear the term “butt wink”. It’s far less common.
I believe this variation has arisen partly from the public misinterpreting what they’ve read on the internet, but also partly from CORRECTLY interpreting misleading information.
None of that is a big deal, though. Let’s just talk about it anyways.
Anatomy of a Round Back

The round back is characterized by flexion at all sections of the spine.
This is NOT a common standing posture because it requires too much energy to maintain, but it can be useful when doing abdominal exercises.
Anatomy of an Arched Back
The arched back is an excessive anterior pelvic tilt, excessive lumbar lordosis, flattening of the thoracic spine, a hinge at the base of the neck, and a flattening of the cervical spine.
This is one of the most common standing postures. It’s attributable to “standing up straight” or being highly alert for long periods of time.
This position steals mobility from the spine AND every other joint in the body. It also promotes hyperventilation while impairing rest and recovery, but that’s a topic for another day.
Anatomy of a Sway Back

The sway back, swayback, or swayed back posture is perhaps the most common undesired spinal posture. It worsens with age and fatigue.
This posture conserves energy by resting the body’s weight on the organs, joints, and ligaments instead of using muscle to stay erect.
The sway is complicated because the upper back looks hunched, but closer examination generally shows flattening of most of the upper back with a hinging hypermobile section in the middle back which is responsible for the apparent rounding.
Comparing the Types of Spinal Curves
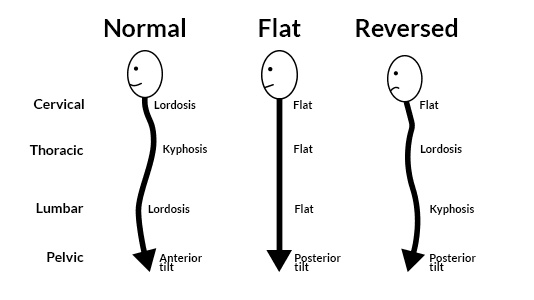
Deviation from the “normal” spinal curve reduces mobility, but is sometimes still desirable. For example, you want a flat spine when supporting heavy weights, but this will limit your squat mobility.
Why is Butt Wink Such a Big Problem?
Butt wink is a detriment to joint health, mobility, and performance.
Butt Wink Wears on the Spine
Research from Dr. Stuart McGill’s lab at the University of Waterloo in Ontario, Canada shed light on the truth to spine health.
Their research shows us that repeated movements of a loaded spine introduces wear and tear to the intervertebral discs. The load that goes through the spine multiplies when moving off axis, making seemingly innocuous tasks more aggravating. Heavy squats and deadlifts with a butt wink are a version of this loaded spinal bending and are best to be avoided.
Spinal flexion and extension are important movements to have available, but it’s generally best not to move into these positions while under load. Even common exercises like crunches have fallen out of favor with most personal trainers and strength coaches who have researched this topic.
Though Dr. McGill retired in 2017, his research lives on.
…and he’s famous for his incredible mustache.

Butt Wink Makes You Weaker and Slower
To demonstrate strength and power, we need an anchor point; Isaac Newton taught us that a long time ago.
The ground serves as our anchor point for most athletics, daily tasks, and feats of strength. We drive our feet into the ground in order to manipulate our body and weights. For a squat, the push starts at the ground, travels up through the torso, and ends in the barbell on the shoulders. If the torso collapses, we miss the lift.
Butt wink reduces stability to use the spine for mobility instead. Every muscle in the body, however, is stronger when resisting a force rather than overcoming it. When the lumbar spine flexes to achieve more depth, the lifter loses the stiffness that’s so important for demonstrating strength and power.
Butt Wink Limits Leg Muscle Gain
Moving at the spine removes load from the legs and moves it to the back. This reduces the mechanical stress placed on the glutes, quads, and hamstrings. Less stress means less stimulus to grow.
Butt Wink Impairs Conditioning
A butt winked position is actually a spinal curve that’s TOTALLY OPPOSITE of normal. Holding everything together in that alignment takes tremendous effort.
In fact, I have a story for you.
Butt Wink in Olympic Weightlifting
Back in 2014 I was coaching at a USA Weightlifting certification course. This course was two long days of lecture and learn-by-doing exercise.
In this filled gymnasium, everyone had normal, predictable problems: feet are too wide, torso is too upright, etc. But there was one guy sweating like he was running across the Gobi desert, being chased by the police, AND eating five pounds of red meat.
Dude was shredded though, so props to him.
I come over to help him and find he’s been holding a butt winked position for the Romanian deadlift we’re teaching. He’s probably been working on it for twenty minutes at that point, so I give him a little break, work on reversing that curve a bit, and run off to help the next poor soul.
But when I come back around to him about twenty minutes later, he’s sitting down. Gassed out from staying bent over with an empty barbell. And he never jumped back in.
I have no doubt in my mind that this guy was one of the fittest in the room, but no amount of conditioning can overcome the mechanical disadvantage of a butt wink.
Okay, so we understand what butt wink is and why it’s such a problem, but why is it there in the first place?
What Causes Butt Wink?
Butt wink usually arises from poor lifting technique. This is a very fixable problem and you should be squatting without issue in no time.
Some people, however, have anatomical limitations that require exercise modifications.
Anatomical Limitations
Sometimes butt wink can be totally attributed to a lifter’s own unique anatomy.
If there’s one thing I learned during my masters program, it’s that everyone is different. For example, the same artery might arise in two totally different spots in two different people.
In this section, we will discuss the variations in anatomy that dictate our hip mobility, and therefore how susceptible we are to butt wink. We start with soft tissue restrictions and end with bony restrictions.
Posterior Hip Capsule Stiffness
The term “tight hips” is overused. “Tight” is a vague descriptor when it comes to diagnosing mobility problems as muscles can be tight for multiple reasons.
Stiffness, however, is specifically describing the stretchiness of a tissue. When something is stiff, our body tends to avoid it. This is like when we leave a room: we usually use the doorway instead of blasting through the wall Kool-Aid man style. We take the path of least resistance.
In the squat, a stiff posterior hip capsule prevents the lifter from sitting back, loading the glutes and hamstrings, and driving through the heels. This manifests as a forward shift where the shoulders cave, the butt winks, and the heels rise off the ground.
Related video
Calf and Ankle Stiffness
When lifting heavy the heels should stay firmly planted in the ground throughout the entire lift. If they don’t, our weight shifts forward and everything falls apart.
When watching a lift where the heels rise off the ground, it’s easy to attribute the problem to tight calves that need to be stretched. But remember, we need to be more specific.
There are three main reasons the heels will rise off the ground, listed here from most to least prevalent:
- Something further up the chain has gone wrong and the ankles are trying to help out, i.e., a stiff posterior hip capsule pushed the body’s mass forward and the calves kick on to prevent toppling over
- The calf muscles and calcaneal (Achilles) tendon are stiff and don’t want to be stretched
- The bones of the ankle joint don’t allow for full dorsiflexion
Stay tuned for later where I’ll discuss testing for tight ankles and what to do about it.
Knee Mobility Restrictions
Previous injury or poor rehabilitation after surgery can lead to lasting knee flexion limitations. If the knee can’t bend when descending into the squat, either squat depth will be limited or the body will compensate with a twist.
Hip Socket Depth
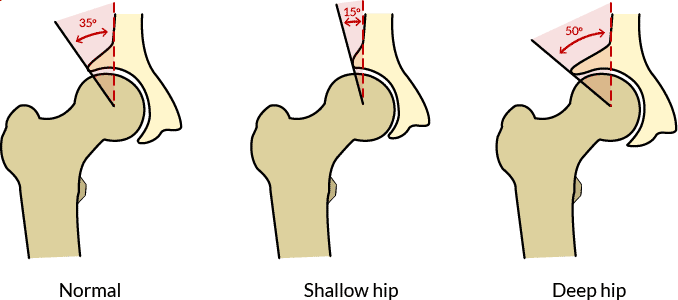
Deep hip sockets can be measured with an x-ray. The hip is what we would call a “ball and socket” joint, meaning one half of the joint is spherical and the other half receives that sphere. The shoulder is another notable ball and socket joint.
Having a deep hip socket means that more of the ball shape is covered by the socket. Deep hip sockets are less mobile and require less muscular force to stay stable. People with deep hip sockets have trouble squatting low, but are better at high force activities like powerlifting.
Having a shallow hip socket means less coverage, more mobility, and more force from the surrounding musculature. People with shallow hip sockets are more susceptible to joint degeneration due to higher pressure inside the joint. They tend to enjoy low force activities like yoga.
A severely shallow hip socket is often called “hip dysplasia”.
| Deep hip socket | Shallow hip socket |
|---|---|
| less mobility | more mobility |
| more stability | less stability |
| good wear and tear | poor wear and tear |
| more likely butt wink | less likely butt wink |
How Deep Is Your Hip Socket?
A knowledgeable personal trainer can compare you to her or his other clients and give you a good guess as to how mobile your hip might be. If you needed a diagnosis, your doctor might take an x-ray or CT scan and measure two angles: (1) Wiberg’s Center-Edge angle for superior joint coverage, and (2) Acetabular Anteversion angle for anterior joint coverage. Other measurements might include Sharp’s angle, Stulberg and Cooperman’s Acetabular Depth-to-Width Ratio, or Heyman & Herndon’s femoral head extrusion index. Here’s a useful research article if you want to dive deeper. See Figure 5 to reference these angles.
| Measurement | Value indicating hip dysplasia |
|---|---|
| Sharp Angle | < 45° |
| Acetabular Anteversion Angle | < 15° |
| Center-Edge Angle | < 20° |
| Acetabular Depth-to-Width Ratio | ≤ 250 |
| Femoral Head Extrusion Index | ≥ 25% |
Cam or Pincer Hip Impingement
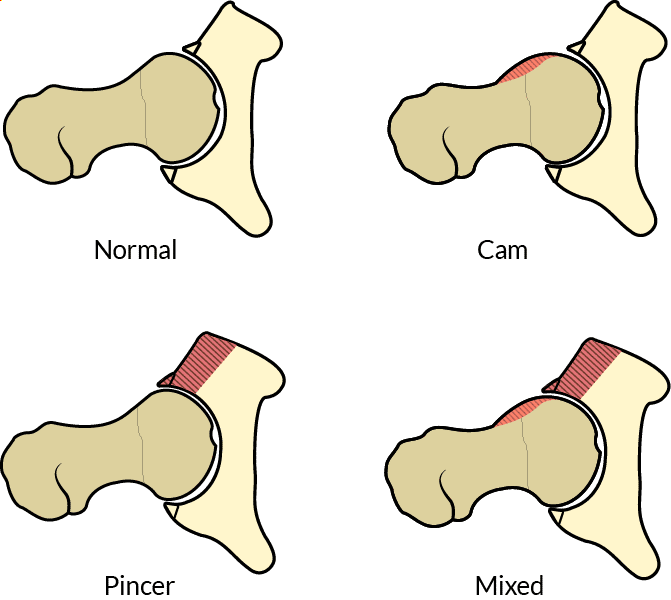
The term “hip impingement” can be confusing because it can mean one of two things:
- Bony restriction of movement secondary to joint position, e.g., a hip that’s completely flexed cannot flex no mo’
- Bony restriction of movement secondary to excess bone formation around the joint, e.g., cam, pincer, or mixed impingement
If your joint can’t move more because it’s out of space, you can free up the joint by moving the impeding bone out of the way. Another option, however, is simply changing the demands of the movement. For example, if the hip won’t allow you to squat deeper, don’t squat deeper.
Where Hip Impingements Come From
Extra bone grows because forces at the bone tell it to.
Hip impingements are common in ice hockey goalies because they spend so much time in forceful hip flexion and abduction. The neck of the femur and rim of the acetabulum repeatedly and forcefully bang into each other. This simulates instability and the extra bone forms to restrict movement at the joint, helping prevent dislocation.
Treating Hip Impingement
There are surgeries to shave off the excess bone in a cam or pincer impingement. This might be a reasonable option for athletes looking to maintain their performance.
Keep in mind, however, that bone grows back after trauma, so if you don’t fix the underlying problem, you may find yourself back in the operating room in a few decades.
| No impingement | Hip impingement: Cam, pincer, or mixed |
|---|---|
| painless mobility restrictions | painful mobility restrictions |
| healthy labrum likely | unhealthy labrum likely |
| less likely butt wink | more likely butt wink |
If you want to dive deeper, here’s a research article on how a radiologist examines hip impingement.
Hip Anteversion and Hip Retroversion
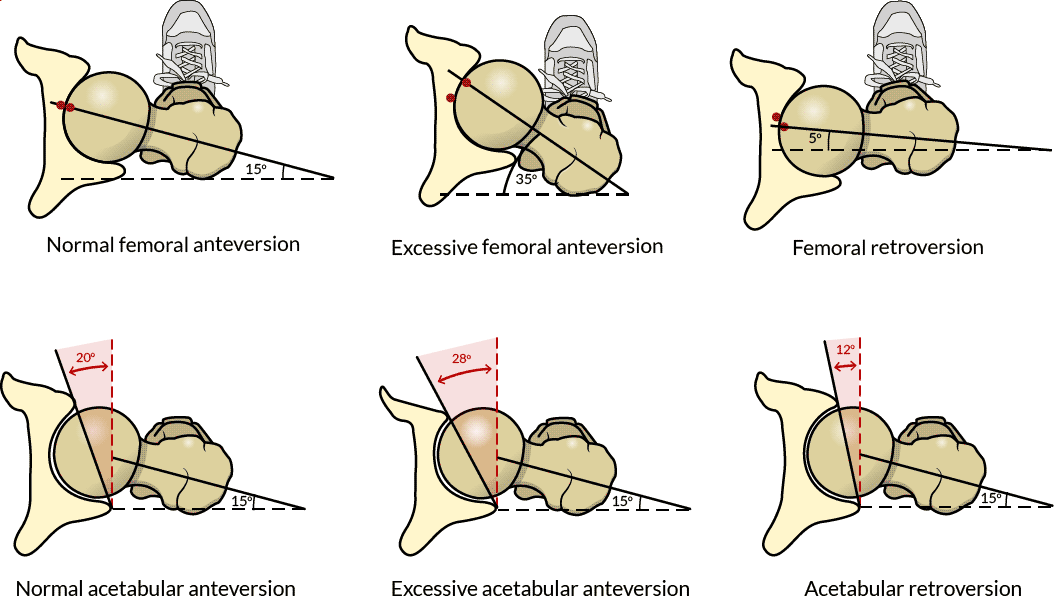
Anteversion and retroversion describe the resting orientation of the hip joint. An anteverted joint is more open in the front (anteriorly), while a retroverted joint is more open in the back (posteriorly).
For each, there are two sub-types:
- Femoral, a twisting of the shaft of the femur
- Acetabular, a twisting of the hip socket
To achieve maximum stability in the hip joint, the leg has to rotate which may negatively affect the knee, ankle, and foot alignment below.
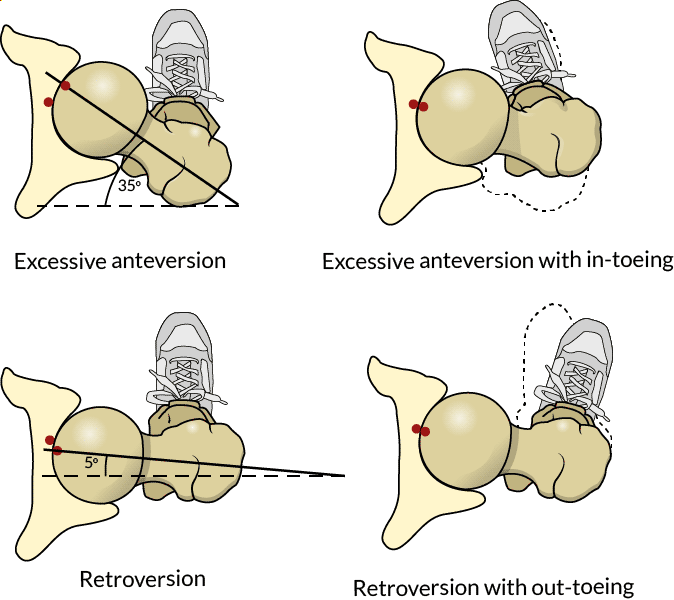
Therefore, a lifter with retroverted hips may require greater toe out, and a lifter with anteverted hips may require greater toe in.
A normal pelvic bone still has slight anteversion. As the orientation of the bone changes, so does the anteversion angle. This means it is possible to affect the hip joint’s function with simple positioning exercises. More on this to come later.
| Anteversion | Retroversion |
|---|---|
| instability in front of hip | Instability in back of hip |
| more hip internal rotation | less hip internal rotation |
| less hip external rotation | more hip external rotation |
| prefers narrow stance | prefers wider stance |
| prefers toe-in | prefers toe-out |
| more likely butt wink | more likely butt wink |
If you want to dive deeper, here’s a research article on acetabular retroversion and here’s a research review on femoral anteversion and hip osteoarthritis.
Coxa Vara and Coxa Valga

Coxa vara is a decreased inclination of the femoral neck and head. Coxa valga is an increased angle. These changes lead to altered hip mobility and function [citation for coxa vara; citation for coxa valga].
| Coxa Vara | Coxa Valga |
|---|---|
| no change in hip flexion | no change in hip flexion |
| less hip extension | less hip extension |
| no change in hip adduction | less hip adduction |
| less hip abduction | more hip abduction |
| less hip internal rotation | more hip internal rotation |
| no change or less hip external rotation | less hip external rotation |
| more likely butt wink | more likely butt wink |
Now that we’ve exhausted our list of anatomical limitations that might contribute to butt wink, let’s move on.
Forced Range of Motion
Our second major cause of butt wink is a consequence of not appreciating the anatomical limitations we just described.
If the hips, knees, and ankles don’t allow for a full butt-to-heels squat, then the body will HAVE to compensate when doing a full butt-to-heels squat.
Too often I see lifters squatting deep because some article on the internet said they had to or else they were a wimp. This is not smart training.
Smart training would be tailoring a program or exercise to fit the lifter’s needs, and full depth back squats might not fit the lifter’s needs. There are other ways to build strength, muscle, and fitness.
Fatigue
Our third major cause of butt wink is fatigue. Sometimes the technique is there, but only for a short while. We’ll talk about how to test this later to determine whether there’s a lack of strength or endurance.
Poor Exercise Technique
Our fourth and most common major cause of butt wink is poor lifting technique. Up until this point, most of the stuff we’ve talked about is hard to change; without lots of stretching, the hip capsule’s stiffness won’t change, and without surgery, the shape of the hip joint won’t change.
Technique, however, can change in an instant.
The tough part is knowing what cue to focus on. Then, the even tougher part is implementing it while you’re mid-set, sweaty, and exhausted.
Now that we’ve got a solid understanding of the fundamentals, let’s figure out the specifics: what do we do to fix butt wink?
How to Fix Butt Wink in a Squat
It might be obvious by now, but butt wink can show up for a ton of different reasons. Most people can eliminate butt wink by modifying how the squat is performed. But some have a more complicated situation.
In this section, we’re going to walk through the six scenarios that can cause butt wink when squatting. Each sub-section will have a test to determine if this scenario applies, followed by recommendations on what to do.
Ensure Full Knee Flexibility
Knee flexion and tibial internal rotation is required for squatting. The deeper the squat, the more the knee has to bend.
Standing Passive Knee Flexion (Heel to Butt)
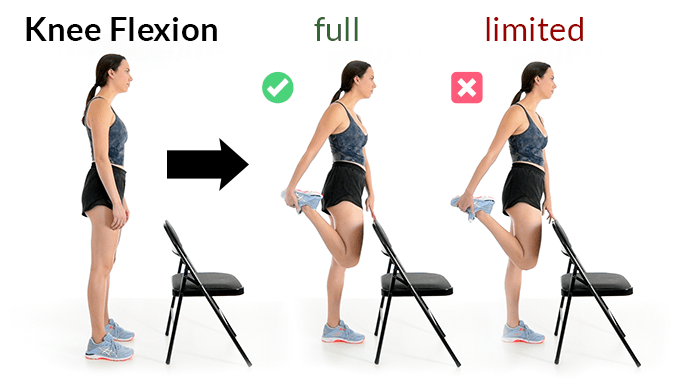
Execution
- Stand on one leg next to a chair or wall to use for balance
- Grab the hovering foot and pull it all the way to the glutes
- Repeat on the other leg
Grading
- We’re looking for the heel to contact the butt
- If the knee does not bend until the thigh and calf are touching, then knee flexion is limited
Fix
- If knee flexion is limited, reduce squat depth to avoid unattainable amounts of knee bending
Ensure Full Hip Flexibility
Hip flexion is required for squatting. The deeper the squat, the more the hip has to bend.
Hip flexion mobility is largely determined by the position of the pelvic bones. A strong anterior pelvic tilt steals hip mobility while a posterior pelvic tilt allows for deeper squats.
Quadruped Rockback
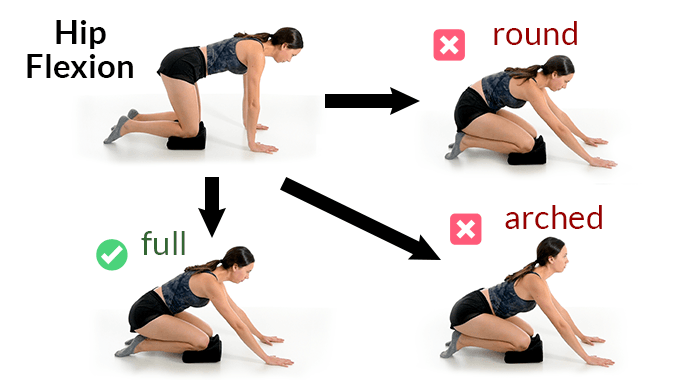
Execution
- Start on hands and knees with knees directly underneath the hips and toes pointed away from the body
- Align a neutral spine as if squatting
- Push the butt backward as far as possible without allowing the spine to move
Grading
- We’re looking for the butt to rock back all the way to the heels without a change in the spinal curve
- If there is a visible arch in the low back, the spine is too extended
- If there is a rounding of the low back, either hip mobility is limited or there is a lack of spinal stabilization when bending the hips
Fix
- If the spine was too extended, practice squatting with the hips tucked and the belly button pulled in slightly. Squat slowly while making sure to maintain this neutral position.
- If the spine rounded during the rockback, practice squatting with the hips tucked and belly button pulled in slightly while paying close attention to squat depth, making sure to stop before the spine bends. This means reducing range of motion.
Ensure Full Ankle Flexibility
Ankle dorsiflexion is required for maintaining an upright posture when squatting. If the ankles can’t bend, the lifter will bow over in an effort to squat deeper.
Ankle mobility is largely affected by balance. If the body’s weight is shifted forward, the calves stay active to prevent falling forward. This contracture steals ankle mobility.
Half Kneeling Ankle Dorsiflexion

Execution
- Remove any footwear and kneel on one knee with the front foot flat on the ground six inches away from the kneeling knee
- Push the front knee forward as far as possible while aiming for the pinky toe and keeping the heel firmly pressed into the ground
- Repeat on the other side
Grading
- We’re looking for the ankle to bend at least 30 degrees without compensation
- Ankle mobility is limited if any one of the following three things happens:
- The ankle doesn’t bend to at least 30 degrees
- The knee drives inward over the big toe
- The heel leaves the ground at any point during the test
Fix
- If ankle dorsiflexion is limited, practice squatting with firm pressure through the entire foot paying close attention to the heel; front-loaded movements like goblet squats and front squats will help because the load serves as a counterweight, forcing the lifter to stay upright and not shift forward
Our fourth test will be a bit of a change of pace. Instead of testing a single joint, we’ll now test how all those joints work together.
Demonstrate Motor Control
Motor control is by far the most common cause of butt wink, but this is good news! It means you can fix your butt wink instantly with just a few cues.
“Chest Up” Ruins Squats
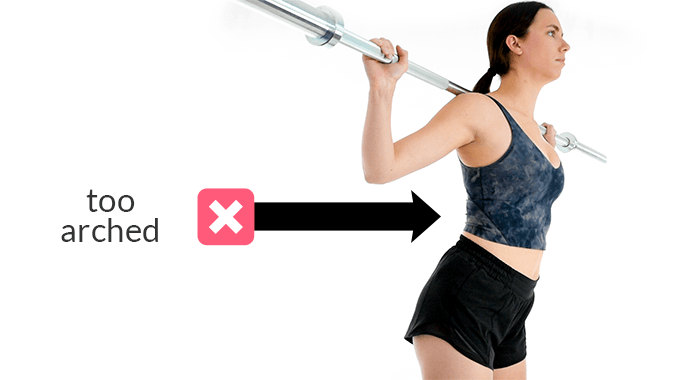
The cue of “keeping your chest up” throughout the squat or deadlift is perhaps the most overused, unhelpful cue in any lift. Superficially, it makes sense to keep your chest up if it’s collapsing. Once your upper back starts to cave, everything else tends to follow… all the way up until you’re stapled into the squat supports (or worse, the ground).
Don’t get me wrong, “chest up” CAN be helpful. But success is rare unless the lifter is inexperienced and stuck in a sway back posture. It can be a helpful cue in heavily suited powerlifting, as well.
The problems happen when you take this cue too far. Massive thoracic extension is the OPPOSITE of a normal spinal curve. When this happens, the lumbar spine has to reverse and the lifter loses hip mobility. Lumbar flexion then makes up for this loss of hip mobility, and we call that “butt wink”.
Collapsing the chest is bad, but over-elevating the chest is also bad. As with most things, we want a happy medium.
Spot Butt Wink Before It Happens
After a decade or so of coaching, I can spot butt wink before it happens with roughly 90% accuracy just by watching a lifter set up for their squat.
We stabilize our joints by compressing them with gravity or muscle contraction. Ideal spinal mobility occurs in neutral at rest or possibly with a slight flattening of the spine when under load. We outlined those postures earlier.
When a lifter doesn’t know how to stabilize in a roughly neutral spinal position, they accentuate their curve and increase compression with the paraspinal muscles. This muscular activity locks down the spine and only gets worse when beginning the squat.
So when a lifter sets up with an extended back posture, it’s super likely that they will have a butt wink at the bottom of their squat.
Whole Foot Drive is the Foundation of a Strong Squat
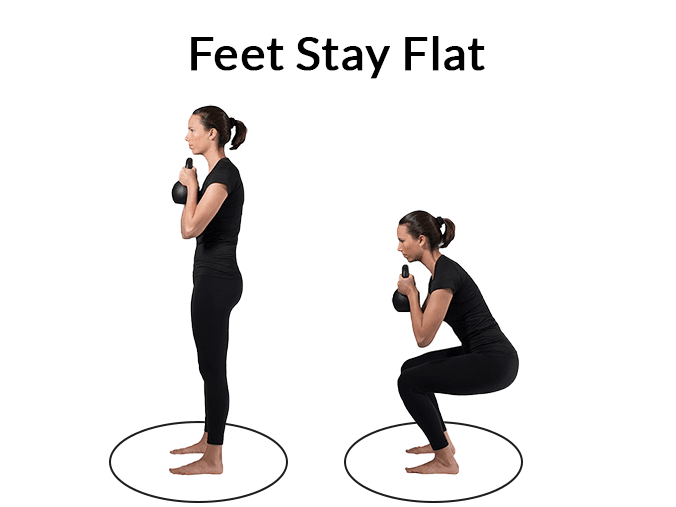
The squat starts with the feet. Mobility in the foot and ankle is necessary for achieving proper range of motion, but stability in the foot and ankle is necessary for being strong and lifting heavy weights.
Therefore, the most important cue when squatting is to keep your feet flat. We don’t want the toes flying around and we don’t want the heels off the ground. This promotes the optimal balance of mobility and stability.
So first, when squatting, think “feet stay flat”.
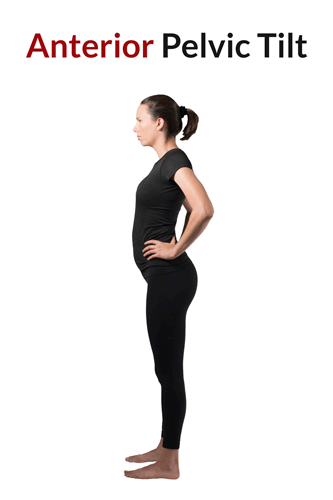
Proper Spine Position Starts at the Hips
Strong footing is important, as we’ve just outlined, but it is not always as simple as cuing “keep the feet flat”.
For stable feet, the torso must be stacked on top of the hips. Most lifters need slight posterior pelvic tilting to bring the hips back to neutral. In the image above, watch how the rest of Allison’s body morphs when she does a posterior pelvic tilt. Remember: everything is connected.
Check out this section on the posterior pelvic tilt from my quad stretches article to see some more positions.
You should practice proper technique in all squatting variations, but the heels-elevated goblet squat is a good first step teaching tool.
Heels-Elevated Goblet Squat
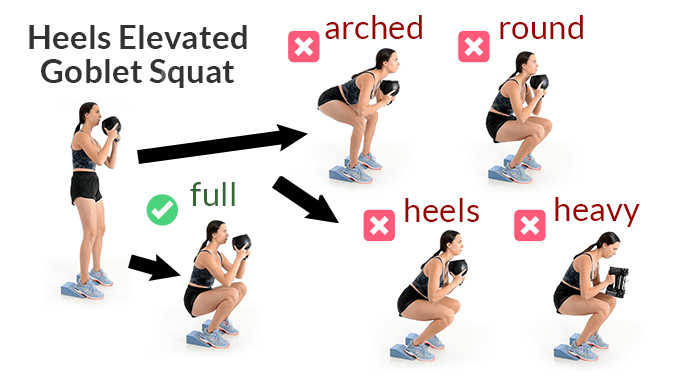
Execution
- Stand with feet shoulder width apart, heels elevated 1-2 inches on a firm surface, and a comfortable weight held in front of the chest
- Tuck the hips into a neutral position where the heels are firmly planted in the ground; it helps to drive the elbows forward and the belly backward
- Squat down as low as possible without losing neutral hip and spine alignment
- Return to standing
Fixing Technique
- We’re looking for a squat without hip, spine, or ankle compensation
- If the tailbone sticks out backward, slow down and make sure to maintain the hip tuck
- If the low back rounds, slow down and attempt to stay long from head to tail
- If the arms get tired or the body rounds over right away, reduce the weight
- If the heels get light or leave the ground, reduce the weight, push it away from the body on descent, and drive through the heels on the way down AND on the way up
Squatting with Great Technique
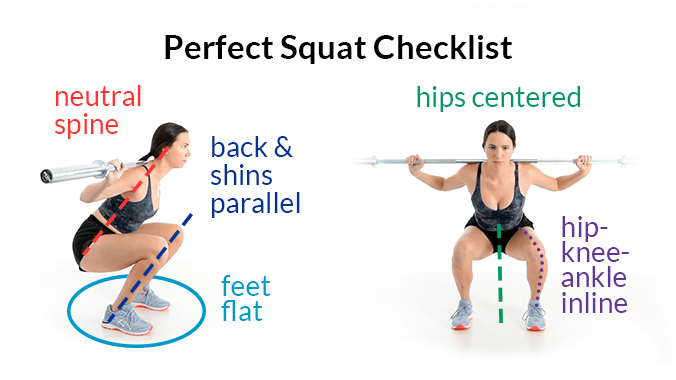
The quickest way to learn how to squat is to just try it and then fix whatever is wrong. We don’t have the luxury of a coaching session here, so I will attempt to outline the most important pieces of a squat.
- Feet stay flat
- Spine stays neutral from tail to head
- Hips are centered between legs
- Knees are inline with hips and ankles
- Back and shins are parallel at the bottom
Avoid Squatting with Bar on Back?
This is an unpopular opinion, but I believe squatting with the bar on your back is overrated.
Putting the bar on the back demands bending forward, which uses up hip and ankle mobility. Lifters can generally squat deeper in safer positions when front squatting simply due to the normal position of the joints.
I don’t mean that back squats are useless. I use them with my clients occasionally, but using them ALL THE TIME leads to stiff hips and achy backs.
Develop Adequate Endurance
Endurance is necessary to maintain technique when fatigued. In my experience, most lifters who prioritize strength neglect endurance.
When Does Endurance Ruin Technique?
- We’re looking for a lifter whose technique is unaffected by fatigue
- If technique degrades as the set goes on, programming should begin building endurance immediately
This is such a common issue that I developed a four month program designed to build strength and endurance while preparing the body for any training program that may follow. It lays a foundation upon which fitness can then be built.
Develop Adequate Strength
Strength is necessary to maintain technique as weights get heavier.
When Does a Lack Of Strength Ruin Technique?
- We’re looking for a lifter whose technique is unaffected by load
- If technique degrades as the weight ramps up, the lifter should lower the weight to where technique stays at least 90% perfect for every rep
A lifter can build strength, sure, but the real problem here is ego. It’s commonly said that “a personal record (PR) never looks pretty”. This toxic mindset leads the lifter to chase PRs, spending their time testing strength instead of building strength.
PRs are a fun and necessary piece of training. I love when people get stronger and think the world would be a better place if everyone could pick up at least 135 pounds. If, however, more time were spent training with great technique, then even the slowest of PRs will actually look pretty good. It’s tough, but rewarding.
A nice balance can be sticking with perfect technique most of the time, but really pushing the challenge on the fourth or sixth week. This gives the joints time to recover while allowing the lifter to push hard and hit new personal records often.
Summary: How to Fix Butt Wink When Squatting
We’ve gone through a bunch of things that cause butt wink and how to fix them. Here’s a short summary of what to do:
- Make sure the knee, hip, and ankle can bend; if they don’t, limit squat depth
- Squat with a neutral spine and whole foot pressure in the ground
- Consider priming good technique by using a heel elevation or weight in front of the body like in the heels-elevated goblet squat
- Lower training volume if fatigue negatively impacts technique
- Keep training weight reasonably challenging so that exercise technique remains at minimum 90% perfect
Add some color to this commentary.