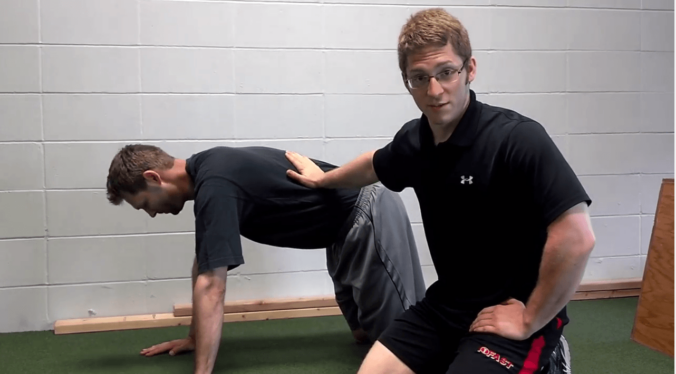
I shot this video a while back and have sat on sharing it because the exercise technique outcome isn’t great. I think, however, this video shows a good example of coaching on the fly.
Watch the subject perform the exercise and identify what is wrong.
Try to think of a cue that will fix everything. If not, fix the issue that will give you the greatest progress.
When that doesn’t work, try something else. For example, you can show them what is happening, or, as I did in the video, grab them and put them in the right position.
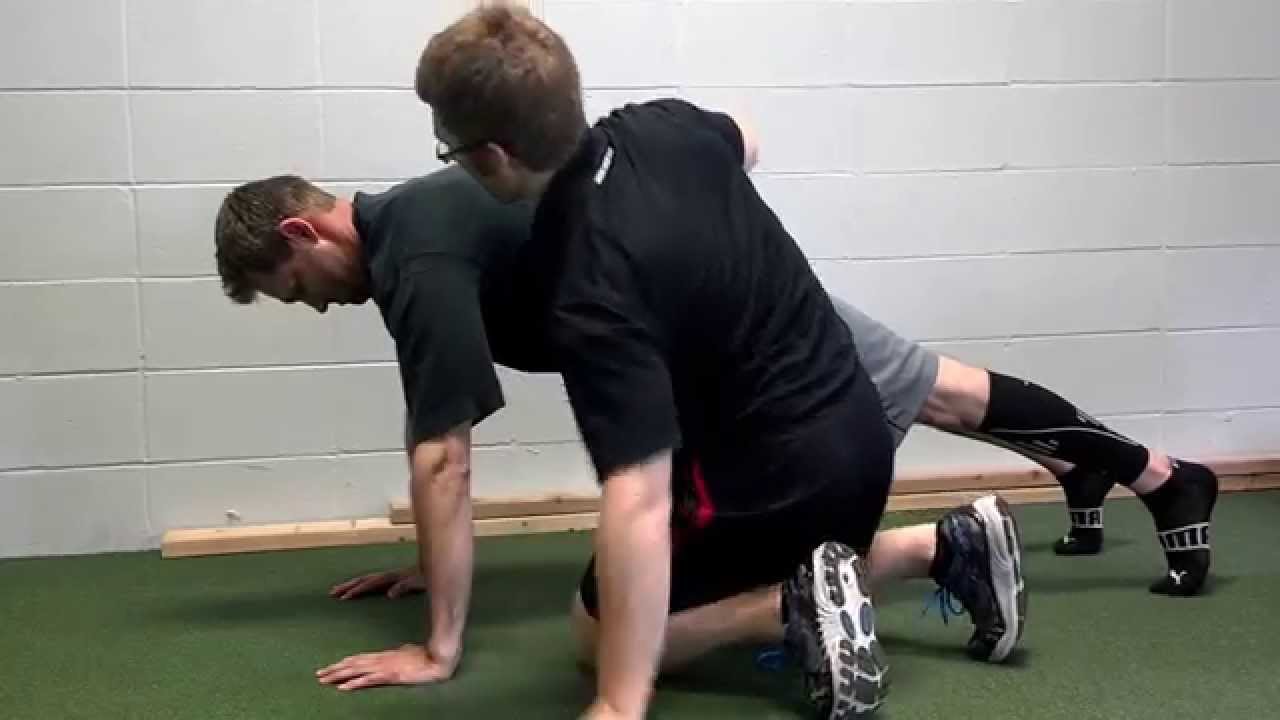
So why does his back still look so stiff at the end?
Well, Ben has been working out for a long time. During his years in the gym, he has heavily cemented his push up pattern (the one you see in the video) over this time.
Maybe I could have made it look perfect, but at what cost? Providing too many cues ensures that no long-term progress is made and puts the client in a stressed out psychological state. They’re either frustrated with you, the trainer, for not being able to help them, or they’re frustrated with themselves for not being able to do what you are asking them.
In my experience, I won’t fix Ben in one day. He has too much neurological stiffness to overcome. He’s quite coachable, but he’ll still be resistant to adopting a new pattern.
What I can do, however, is remind him every time he does his push ups to finish with his arms long like they’re reaching through the ground. I could also have him bring his sternum to his spine, as I tried in the video. Or I could try a million other cues.
Then, I’ll probably notice his “reach” is actually just a crunching motion around the level of the 8th thoracic vertebra, T8. That’s that rounded hump in his back that I mention in the video. You’ll notice that the angle here increases after I cue him. He doesn’t want to turn on his serratus anterior muscles to give him the reaching motion, so he makes his arms longer by crunching them forward.
So then, I have to fix the damage from my previous cue. “Try to stay long through here like a board or piece of wood.” The problem is that it’s really difficult to get someone to differentiate levels of the spine like that. Maybe I get out a PVC pipe and put it on his back to help me. Maybe I give him a different exercise. Maybe I leave it alone and see if it gets better next time.
I will remind him every day I see him, and eventually his brain will learn the new pattern. My cues will change in the time being because there may be a better one for him next week. I’m not necessarily striving for perfect form, just better form.
I know all of this might seem like random babble, but the art of coaching is honing in your thought process and sprinkling in creativity. I’m just trying to give you an example.
Today I wanted to share a new video that shows how to set up with dumbbells for pressing exercises.
I’ve had a lot of people tell me that if they can get the weights up there, then they are able press them. This method allows you to get heavier weights set up.
This is especially important for someone who trains alone and has a history of shoulder problems. I might not want them pressing with a bar so much because of the restricted motion, but I still want them to get big and strong. In order to do so, they must be able to get some heavy dumbbells set up on their own.
As with anything, there’s a learning curve to this method, but I think you’ll love it. Give it a shot.
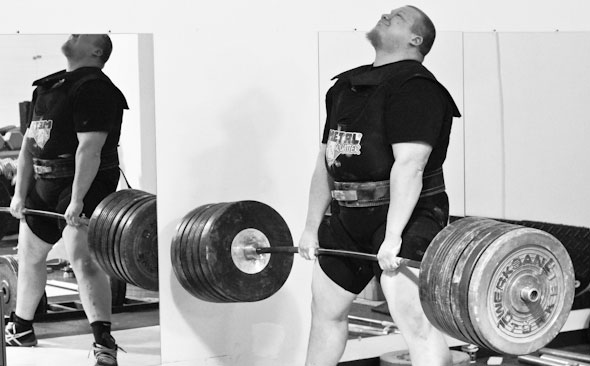
The deadlift is a big movement that utilizes every muscle and joint in your body. You better be good at doing it.
But how do you know you’re doing it correctly if you can’t see yourself doing the lift?
Today I want to show you a trick that can help you out. Check out this video below.
The first rep is without a cue to turn on the lats. The second rep is with it.
Watch the video again. Notice the bar’s path of travel.
During the first rep, the bar never really gets to my midfoot, which is about where I would ideally want it. When the bar is in this position, it has better leverage than I do.
During the second rep, watch the bar go back. There I can finally sit into it.
What’s funny, however, is that you may have watched the first one and thought, “Well… that wasn’t too bad.” Then when you see the second rep you think, “Jesus, that first one was terrible.”
Coaching yourself isn’t entirely a guessing game. You don’t have to fabricate a cue out of the blue that you think will work for you. If you’re an inexperienced lifter who lifts alone, film a few sets. Compare set one and set two.
What did you feel working?
How did the reps feel?
Which one looks better: one or two? Make your workouts like a visit to the doctor’s office.
When you aren’t sure what you’re looking at, you need more experience. Try something new and re-evaluate. The secret to the training process is understanding the scientific method. It is simply trial and error. What did I do wrong? How do I fix it?
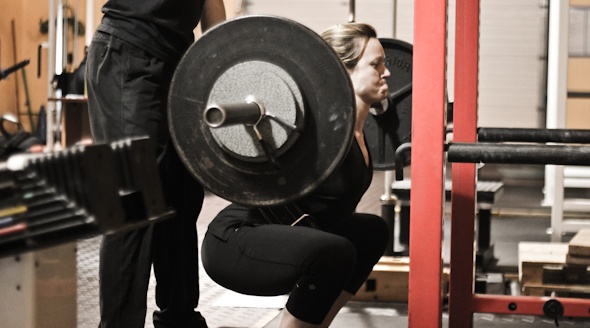
I was at the gym the other day and I saw one of our clients, Ben, performing some front squats incorrectly. I decided to turn the camera on to show you guys how I might troubleshoot a problem like this. Watch the video below to see what I’m talking about. (If the words are in the way, turn of the subtitles by hitting the “CC” button in the player.)
Why Should I Bother Fixing This?
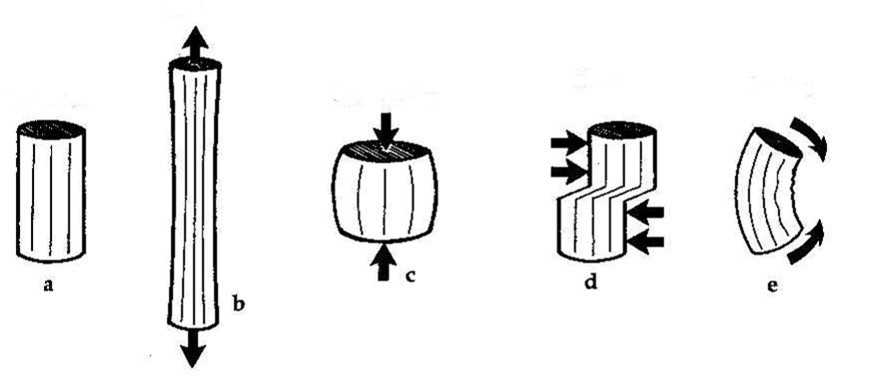
There are four types of forces that our joints experience:
Tensile
Compressive
Shear
Bending
Tensile (b) is like what your shoulder feels when you hang from a bar. This is a lengthening force.
Compressive (c) is like what all your joints do when you brace for a heavy squat. This is the method that we use to stabilize ourselves.
Shear (d) is like when a running back performs a cut, but someone dives on his ankle. The lower leg is directed inward while the upper leg is moving out.
Bending (e) is like when an MMA fighter receives a leg kick in the middle of the shin.
So given this, teacher Lance has two questions for you:
What kind of force would be the most detrimental at a joint like the knee?
What kind of force is vastly increased when you collapse inward on a squat?
The answer for both is the same: shear force.
Lots of my coaching has the same objective: minimize the shear forces to increase longevity. I’d much rather have compression over shear because then the bones can help out – they are really good at handling compression. What handles shear? Ligaments and other soft tissue in the joint. Too much shear at the knee and these tissues blow out. How many people do you know with an ACL or MCL injury?
Keep in mind that a little bit of shear if I’m testing the amount a joint moves (known as “joint play”) is not nearly the same as when the running back we talked about earlier gets his lower leg pushed in. The latter is much more severe because in addition to the external shear force (a force from outside his body) there is also a ton of compression on the knee joint from the body’s weight, momentum, and from contracting muscles. Combining the two is what exacerbates the problem: the joints are not as congruent AND they have to deal with a bunch of other crap.
But I may not always cue the knee position first. It depends on the person.
The Individuality Principle
One of the first things that you learn in Exercise Science courses is that everyone is different. It’s hard to generalize findings across a population, so you have to get really good at observation. Each rep performed is an experiment that you must evaluate to draw a conclusion. You’re doing research in your head. This research differs from publications like Nature and Pain in that it is anecdotal evidence and results from amassing many n=1 case studies—and you didn’t need to spend a day going through IRB training. As you collect more data (i.e. experience), you get more confident that what you’re finding isn’t an anomaly. As I’ve learned from watching a countless number of people squat, there are six schemas in my mind in which I will place a client before I decide what my cues will be. These schemas make selecting cues nearly subconscious (my basal ganglia and I are reinforcing a habit), which allows me to focus on my interpersonal demeanor (which is arguably more important anyways).
Females with prior knee injury
Males with prior knee injury
Female athletes
Male athletes
Children
Everyone else
I want perfect knee position in everyone with whom I work. I would, however, triage each person a little differently depending on how they present and which group from above they fall under. Each of these groups elicits a different level of my concern for their knees. I’m not as wary of a non-athlete-but-still-athletic male hurting his knees during our time together as I am when I’m working with a middle-aged female who’s already had a total knee replacement. Let me explain why I make each distinction.
Prior Knee Injury vs. No Injury History
The brain changes itself with experience. This allows you to be better at the things you do more often. The plastic nature of this wonderful machine (called neuroplasticity) is what helps stroke patients recover function after their injury. It allows everyday people to become more athletic. It allows Leonardo da Vinci to dabble in everything. Your brain has a map of function similar to a topographical map. The peaks and valleys correspond to bigger or smaller reactions to stimulation.
During my internship in Indiana University’s Motor Control Lab, we had a project where we stimulated certain areas of the brain and measured the output in the hands. This gave us an initial map or the cortex. Then the subjects went and texted on their phones for a few minutes and were mapped again immediately after.
There are two points I’d like to make:
If you don’t text at all, that area of your brain looks like flatlands and doesn’t change much after you introduce this novel stimulus. This is akin to the light colors on the map above.
If you text a lot, that area of your brain is mountainous. You have more dark red areas.
So we could visualize the brain’s adaptation to a stimulus (texting) over the long-term by measuring how proficient you were at texting and the short-term by measuring the change in your cortical map after a trial. This demonstrates the plastic nature of the brain.
Needless to say, plasticity is a broad topic that I’ve oversimplified, but it is important to note that it doesn’t always work to our advantage.
Think about your daily habits. If you have ice cream every night, it gets easier and easier to have ice cream at night as those pathways become reinforced.
The same goes for people who have injured their knee(s). After an injury, the structural damage can heal, but pain may still persist because those pathways associated with the pain are still there. I can’t know what caused the injury or if there is still structural damage, but I do know that noxious signals (nociception) are neither necessary nor sufficient for pain. I need to empathize with my client so that I can understand how someone’s brain views its body. Nothing they feel is fake, but feelings between people are difficult to normalize.
It becomes easier and easier for those knees to hurt as the nervous system becomes more sensitive. If this is you, you could have less room for error when performing an exercise.
People with prior injury are psych patients.
I know it sounds wishy-washy, but the reality is that it’s not the same for any two people. This is just a red flag that I must be cognizant of as a coach. Experience tremendously shapes how you see each person.
If you want more, the following abstract from Moseley 2003 offers a great scientific summary of this. When he says “neuromatrix”, what he is talking about is the group of nerve cells that fire when pain signals need to be sent.
This paper presents an approach to rehabilitation of pain patients. The fundamental principles of the approach are (i) pain is an output of the brain that is produced whenever the brain concludes that body tissue is in danger and action is required, and (ii) pain is a multisystem output that is produced when an individual-specific cortical pain neuromatrix is activated. When pain becomes chronic, the efficacy of the pain neuromatrix is strengthened via nociceptive and non-nociceptive mechanisms, which means that less input, both nociceptive and non-nociceptive, is required to produce pain. The clinical approach focuses on decreasing all inputs that imply that body tissue is in danger and then on activating components of the pain neuromatrix without activating its output. Rehabilitation progresses to increase exposure to threatening input across sensory and non-sensory domains.
If you want to delve further into the topic of pain science, look up G. Lorimer Moseley on the internet. This DVD is fantastic and even comes with a list of references for you to find and read.
Females vs. Males
Gender is the next thing I process. Structurally, the two sexes are quite different, especially when it comes to the hips and knees, but also with hormonal make up.
The hormones, which fluctuate all the time, can also predispose a woman to winding up in an extension-based stabilization pattern because progesterone speeds up respiration. Suffice to say that this is undesirable. Women also tend to be more loosey-goosey from these hormones and the social stigma that they should be more flexible than men.
There isn’t a whole lot we can do about the hormones, at least in the short-term, and it doesn’t change the fact that I still need to clean up the movement, so let’s bring our focus back on the biomechanics.
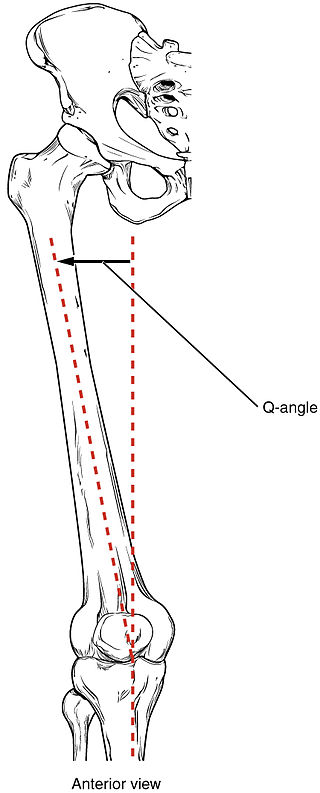
The upper leg bone angles inward from the hip to meet the knee. The angle of the upper leg bone to the lower leg bone forms what is known as the Q angle.
Since women have wider hips that are more suitable for child-bearing than male hips, the upper leg bone starts further out and this Q angle gets bigger. This is normal, but it also predisposes women to a type of shear stress called valgus stress. As we talked about before, more shear means more bad.
Again, this doesn’t mean anything on its own, but you need to be aware.
Athletes vs. Non-Athletes
Why do I care if you’re an athlete? Athletes are constantly pushing themselves to the limit. I want my athletes to choose the right movement strategy whenever possible. I don’t want them to blow out a knee without anyone around them (in sniper fashion). I need to make sure they are reinforcing the safest positions possible in the gym. Gradual exposure to these safe positions makes their brain used to finding this pattern and gives them the ability to access it subconsciously. Remember plasticity and habits?
Said another way, I will cue proper knee position because I want athletes to have sufficient variability to adapt to the demands imposed upon them. I want them to be antifragile. Open environment sports are games where the outcome is determined by more than just your personal performance. These sports require you to react to the changing environment – avoid the other team’s defenders and neutralize their attackers. Different athletes need different levels of variability, but if you consider our running back again you realize he needs to have many different movements available to him to avoid being tackled. If he can’t turn left as well as he can turn right, then the smartest opponents will force him to turn left every play.
If you’re an athlete who plays a closed environment sport, then you need less variability to perform your sport. A powerlifter doesn’t need as much variability as a football player.
Children vs. Adults
The last distinction I make is whether or not the person I’m training is fully developed or not. Children are more resilient, yes, but they are also more susceptible to change.
Wolff’s law says that bones will remodel themselves based on what type of stresses they encounter. This law suggests you can view Osgood-Schlatter disease as a results of overuse rather than something you were destined to develop, but remember that both genes and environment play a role.
Training kids is all about development. I want them to learn how to deal with all types of forces (remember that neuroplasticity from above), but if I’m going to give them any sort of load in the gym, those knees best be in the right position.
Remember rule #1: do no harm.
How Can I Tell if My Knees Are in the Correct Position?
So I’ve been talking about all this position stuff and you’re thinking, “Uhh… I had an ACL injury. Do I need help?”
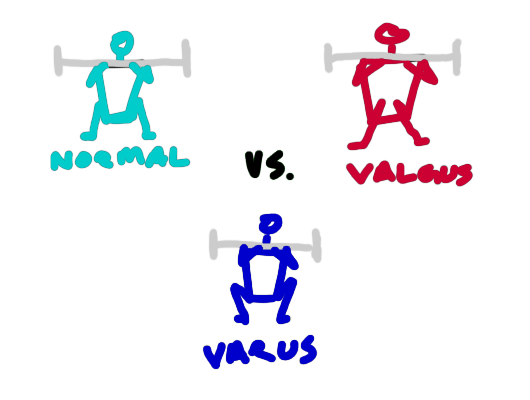
I gloss over it quickly in the video above, but what you need to look for is the knee’s relationship with the hip and foot. If you draw a straight line from the hip to the foot and it intersects the middle of the knee, then you’re golden, Ponyboy.
If the knee falls in or out of that line, then it’s worth fixing.
After you look at the picture above, go back up and watch the video again. Can you see what I’m talking about in Ben? With valgus, you’ll see the arches of the feet collapse (like in the video). With varus, you’ll see a rolling on the outside of the foot.
Okay, My Knees Suck. How do I Fix It?
The simplest way to fix it is to think “turn the knees out”. This, however, doesn’t always get you what you want. Sometimes a better cue is “open the hips”, and you’ll see in the video that I use a combination of these two for Ben.
My favorite cue, however, for fixing hip, knee, and foot alignment is an all-encompassing one. Imagine you’re standing on a towel, then spread your feet like you’re trying to stretch the towel apart. If I’m working with someone, I’ll first explain the cue like I just did with you, then make it so that I can just say, “Spread the floor,” during a set and they know what I’m talking about. This cue is so great because it accounts for the hips shifting, the knees rolling in or out, and the foot’s contact with the ground. If you want to be stronger instantly, you need to try this cue.
My experience is that usually the hip is driving the knees and feet inward, but sometimes the feet are behind the proverbial wheel. If either of these cues don’t work, I would attack the feet next. Cue their foot into the right position and make sure they are in appropriate footwear. Below is a video on each of these two subjects
Here is a list of things to do to start cleaning up your squat:
Take a video of yourself squatting with a view from the front or the back (side views won’t work). Do a couple reps.
Look at your position at the bottom of the squat (knee instability is more pronounced at the bottom). Are your knees inline with your hips and toes?
Spread the floor.
Re-evaluate to see if it worked. If it didn’t, change up your plan.
This is basic biomechanics that I wish were common knowledge, not just among trainers but everyone. If you have a friend who had knee surgery (or is a woman), help them out and share this article with them.
What questions do you have? Leave them in the comments below.
It’s been a crazy few weeks in Indy! Tons of new assessments coming through IFAST that I’ve been handling and I start filling in as the front desk girl this morning. I wanted to get something out for you guys, so I figured I would share a short video I shot on improving your squat. There will be a long post that details this process better sometime next week, so stay tuned and send me an email if you want to get on the reminder list. This thing is turning out to be a 2000 word monster.